canton-network-docs/Deep DivesQuickStart
Using the JSON Ledger API
Using the JSON Ledger API
Overview
You are ready to extend the CN Quickstart to interact directly with your LocalNet. You’ll learn how to programmatically create parties, upload DARs, create contracts, and integrate with Canton Coin (Amulet) using OAuth2 authentication against your running LocalNet. By the end, you’ll have the hands-on experience with critical API patterns needed to build your own Canton Network applications.Prerequisites
This guide requires the Digital Asset Package Manager. Follow installation instructions at DPM. You should have also finished the Quickstart installation and Explore the demo tutorial. We also recommend reading the developer journey lifecycle to better understand how Quickstart bootstraps your Canton Network development by providing the tooling you will need for any CN app.LocalNet interaction expectations vs Explore the demo (using app vs developer skills)
In the demo, you interacted with LocalNet through the web interface as a user. Now you’ll take control of LocalNet directly through APIs, learning to programmatically manage the network infrastructure that will become your foundation for building on ScratchNet, TestNet, and beyond.Project directory structure
The CN Quickstart contains the following directory structure:daml/licensing/; in this tutorial you’ll exercise them through the JSON Ledger API.
LocalNet env & auth
Env verification
The Quickstart application should be built and running. Verify that all services are operational in the terminal withmake status.

Port mappings
Security consideration
The port mappings forLocalNet expose the AdminAPI port and the Postgres port, both of which would normally be a security risk. However, having direct access to these ports when running on a local developer’s machine can be useful. These ports should not be exposed when preparing deployment configurations for non-local deployments. The port suffixes are defined as environment variables. For any port mappings you wish to disable, you can find and remove the relevant Docker port: entry in the appropriate file.
JSON API ports
(2975, 3975, 4975): Daml ops and smart contract deploymentValidator API ports
(2903, 3903, 4903): status monitoringOAuth2 & token mgmt
Overview
LocalNet uses Keycloak at http://keycloak.localhost:8082 for OAuth2 authentication with two realms:AppUser and AppProvider.
Login to Keycloak at this port by using the username and password admin.
JSON API Tutorial
In this tutorial, you’re making API calls to simulate the steps taken in the Quickstart web app by requesting JWT tokens, then include them as Bearer tokens in API calls. Start the application and tools from thequickstart/ directory.
Begin capture logs
make capture-logs
Allow capture logs to run in its terminal window. In a new terminal window, run the Quickstart application with make start. Once complete, this can become your working terminal window. After make start completes, open a new terminal window to initiate lnav. Start lnav with lnav logs/*.clog to capture and analyze logs. If there are no clogs you might try running make stop && make clean-all then rerunning make start. Alternatively, you can begin this guide to make transactions on the ledger. This should cause clogs to self-generate. This command launches lnav to trace transactions, debug issues, and monitor system behavior as you work. Keep lnav running in its terminal window.
Lnav Guidance
For detailed guidance on navigating lnav, and understanding the custom format, see Debugging and troubleshooting with lnav.Get a Token
Use the AppUser validator client to get a token.Use the token
List existing parties and include the token in API requestsView Party and DSO activity in lnav
View Party activity in lnav with thefilter-in command followed by the app provider or app user IDs.
party values for app-provider as APP_PROVIDER_PARTY and app-user as APP_USER_PARTY.
Save the DSO Party
Token management troubleshooting
Tokens expire after a period. If API calls returnCannot iterate over null or 401 Unauthorized, regenerate your token with the command above. For production patterns, see quickstart/docker/modules/splice-onboarding/docker/utils.sh for token management utilities.
Create a party
Create a new party on the AppUser validator.partyIdHint value. Canton may append additional characters for uniqueness.
Success Response:
See the new participant Alice in lnav
Troubleshoot common party creation issues
A security-sensitive error has been received or 401 Unauthorized: Token expired - regenerate with the OAuth2 command
INVALID_ARGUMENT, Party already exists, or 400 Bad Request: Party might already exist - check with:
Upload a DAR
Upload the prebuilt licensing DAR to the validator.DAR Upload issues
404 Not Found: Verify DAR path is correct from your current directory 413 Payload Too Large: DAR exceeds size limit 409 Conflict: Package already uploaded curl: (52) Empty reply from server: Network issue - retry Check lnav for detailed upload logs and any processing errors.Create a contract on LocalNet
Inspect the DAR to find the package hash. Find and save the package ID, a 64-character hex string.b59ffbf847ac36fee1a4a743864274c5d8ab6f02ea8899f49fb5347e9978543f is the project ID that we seek.
Alternatively, if you’re querying the quickstart-licensing DAR, as we do in this tutorial, you can quickly grep and save the project ID with:
See the DAR activity in lnav by filtering the package ID
Create the Contract
Renew your token to query the participant:Get PROVIDER_ADMIN_TOKEN
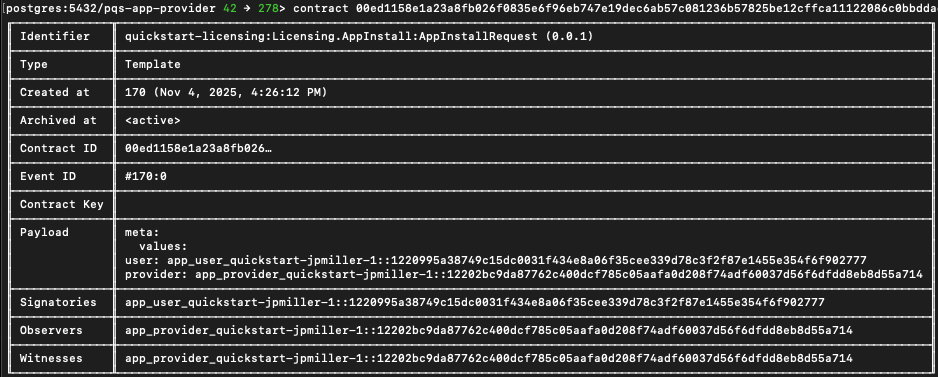
AppInstallRequest:
AppInstallRequest or filter by the updateId value.
 In this screenshot,
 deb9fe66dfb7990e5268f3690dbe53e8 and 61af0b8172d45909f9f8e8c5c4d46f16 are examples of trace IDs.
Access the contract in daml shell
Opendaml shell to query for the created contract. In a new terminal window, from the quickstart/ directory run make shell
Query the AppInstallRequest contract:
 Use the displayed portion of the contract ID to display the contract details.
In
Use the displayed portion of the contract ID to display the contract details.
In daml shell run the command contract followed by your unique Contract ID. In this case: contract 0044e9b until there are no other contract options. Press tab to complete the contract ID and enter to see the contract details.
 Copy and save the contract ID to a new
 INSTALL_REQ_CID variable in the previous working terminal.
Find the AppInstallRequest contract
Get the provider user token as a password grant for party rights.{"updateId":"1220064a62356625ab7338564daedd21487749a7fcd21ad1d3a659b9131e9aadc246","completionOffset":109}%
See the contract in lnav
Generate a token for the app provider
app-provider user exists
app-provider user exists, get the party and verify it’s set (if it fails review the previous steps):
APP_PROVIDER_USER_ID should equal the “id” value.
Return to daml shell to query for the AppInstall contract ID
contract command as before to isolate and copy the complete contract id.
Back to the shell terminal
Check that the token is valid
Exercise the CreateLicense choice
See the AppInstall request in lnav
Get the License contract ID in daml shell
Return todaml shell to get the License contract ID.
Save the license contract ID in a variable
Generate a unique renewal request
Set the license extension
Create the license renewal request
If you receive a “security-sensitive error has been received” then renew the token as before. As a sanity check you may preemptively renew the token.Set the COMMAND_ID variable
{"updateId":"122067883fdbb23d7395fabab7fc44703b3d588e44924fe1d33b45eebc116ecd94a5","completionOffset":220}%
LicenseRenewalRequest
Return to daml shell to get theLicenseRenewalRequest contract ID
LicenseRenewalRequest contract details.
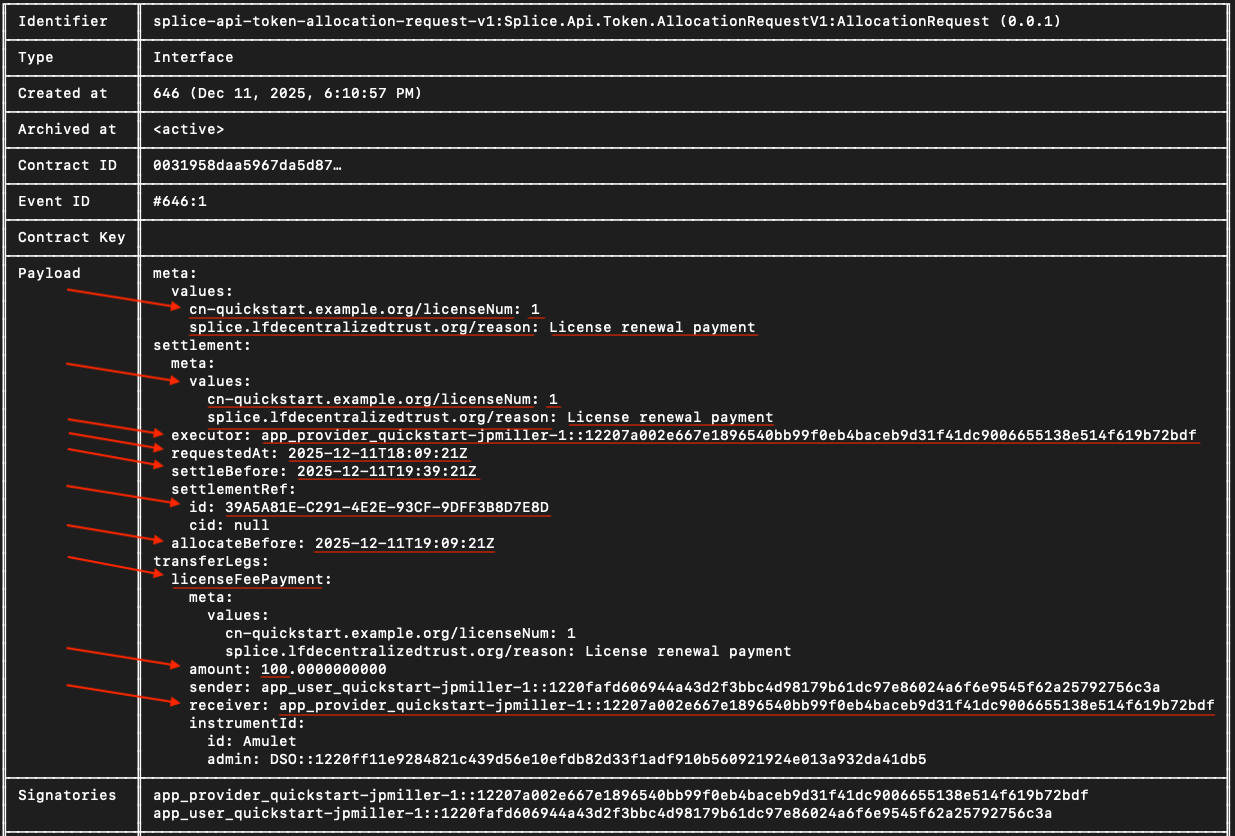 Take note of the
 Payload field. You’ll use the metadata values to send the payment allocation in a future step.
Go back to the terminal and create a new RENEWAL_REQ_CID variable
Return to the daml shell
LicenseRenewalRequest implements the AllocationRequest interface.
The user must allocate 100 CC tokens to satisfy the payment.
daml shell, the transaction must be processed on the ledger, PQS polls the participant for new events and updates its database, and after the sync completes the queries return the new data.
The value in amount needs to be more than 100 to complete this step.
In LocalNet, the Canton Wallet automatically replenishes tokens in each round. If your amount shows less than 100, then you most likely only need to wait a few minutes for the wallet to build up to a satisfactory amount.
Optional: If you’d like to view more details, call the Holding contract ID.
Navigate to the Canton Wallet UI at http://wallet.localhost:2000/allocations
Log in as app-user with password abc123
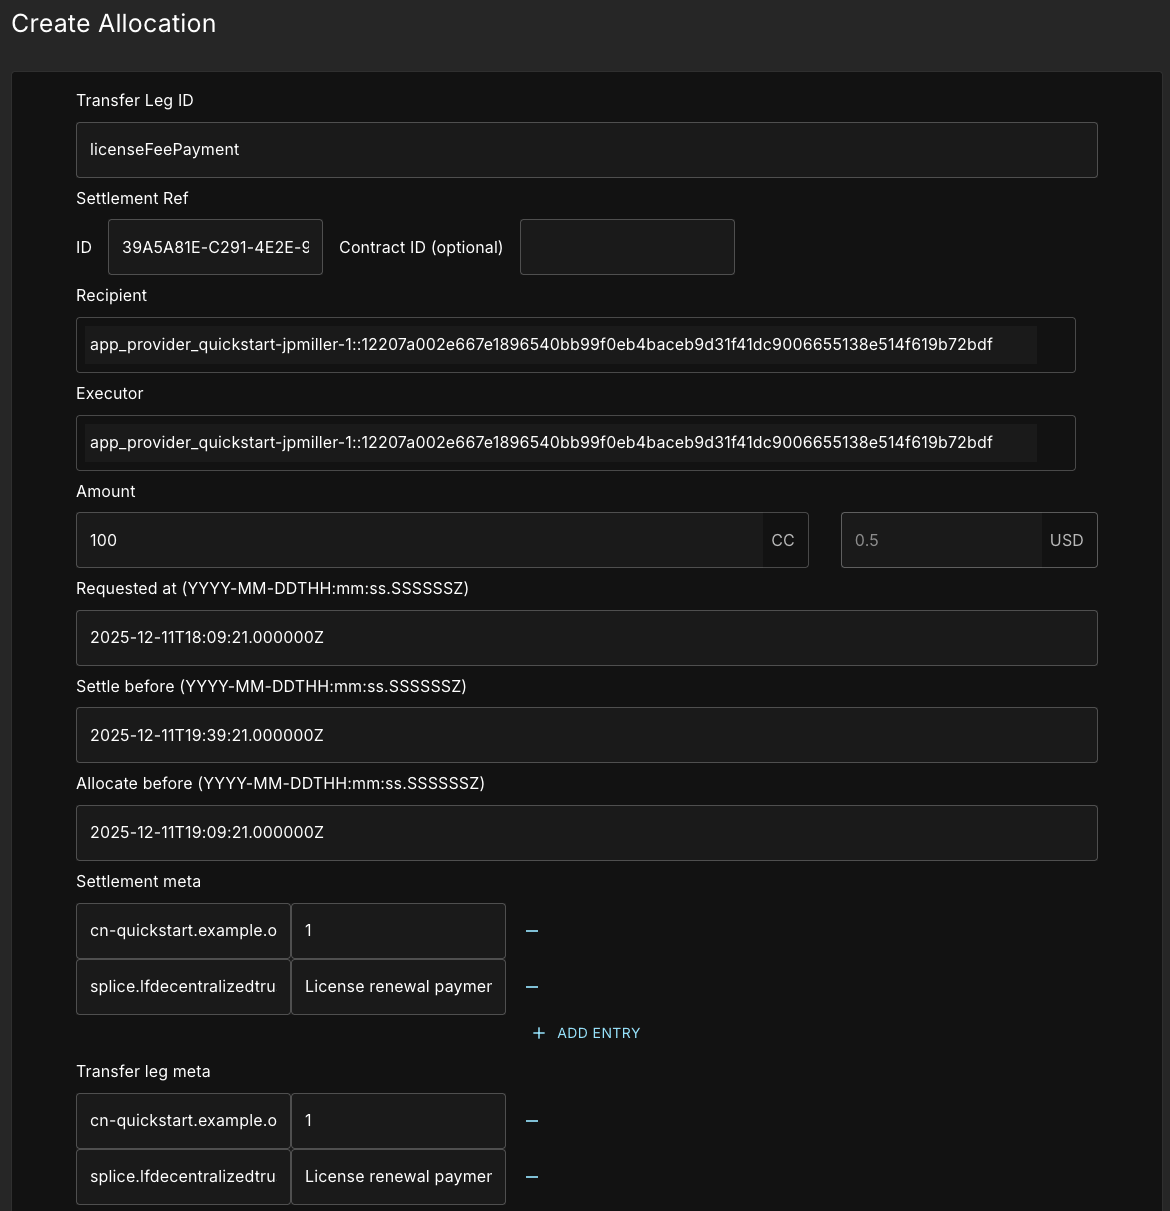
In the demo, the allocation was completed for you via backend processes in the web app. Now, we need to fill out the allocation request manually
You need to manually create an allocation for the daml shell allocation contract even if the UI shows an allocation request.
 Use the
 Payload metadata mentioned above to fill in all the fields surrounded by red.
- Transfer Leg ID:
licenseFeePayment - Settlement Ref ID:
settlementRef.id - Recipient:
receiver - Executor:
executor - Amount:
100 - Requested At:
requestedAt - Settle before:
settleBefore - Allocate before:
allocateBefore
- Key:
cn-quickstart.example.org/licenseNum - Value:
1 - Key:
splice.lfdecentralizedtrust.org/reason - Value:
License renewal payment
payload field in daml shell.
For the times Requested At, Settle before, and Allocate before, you will need to manually enter a ”.” before the “Z” followed by six (6) “0”s.
For example, requestedAt: 2025-10-29T20:38:16Z becomes 2025-10-29T20:38:16.000000Z
Send the request once all information is complete.
Regenerate the provider token in case of security-sensitive errors
Tokens automatically expire over time. This is a security measure and no fault of your own if you experience such errors.Return to the terminal and get a user token
Look up the Allocation Contract ID
Query for the allocation indaml shell
daml shell.
Renew the token
Generate a unique command ID
Set the endpoint path to connect to the backend service to complete the license renewal
A backend service is required for this step because the DSO and the user exchange information stored inlockedAmulet. This information is not available to the Provider and therefore cannot be accessed via the daml shell.
Create a variable for the request body
Make the request to complete the license renewal
licenseId
licenseId that was just returned to you.
Payload field, notice that the expiresAt value is set for 30 days in the future.
Congratulations! You’ve made a complete business operation in the Quickstart application using JSON API (with minimal help from the backend service to collect information not available in PQS for complete-renewal).
Appendix
User token and IDs cookbook
Additional ports the default setup exposes
Ledger API ports (2901, 3901, 4901): Canton Ledger API access Admin API ports (2902, 3902, 4902): system administrationHealth checks
You can find the health check endpoints for each validator inquickstart/docker/modules/localnet/docker/splice/health-check.sh.
Empty responses indicate healthy services.
Access admin ports
Admin ports are defined inquickstart/docker/modules/localnet/compose.yaml