xReserve Workflows
xReserve Workflows
Onboarding Workflow
Once technical setup is complete and the user has access to the xReserve UI, the user can perform technical onboarding to use the xReserve solution to deposit (mint) and withdraw (burn) USDC on Canton Network. Onboarding is thus a one-time, technical setup process the user goes through in order to create the smart contract on chain that technically allows the user to use xReserve solution.
Please note that once onboarding is done, the user will only be able to deposit (mint) USDC only to the Party Id that was onboarded. The Party Id that the user is working with, and requesting onboarding for, can be seen on the top right of the xReserve UI.
Onboarding Steps:
Login to the xReserve UI.
The actual login process is depended on your organization’s authentication policies.
Once login is done, the user lands on a page with no data and a yellow button in the top right corner labeled Onboard.
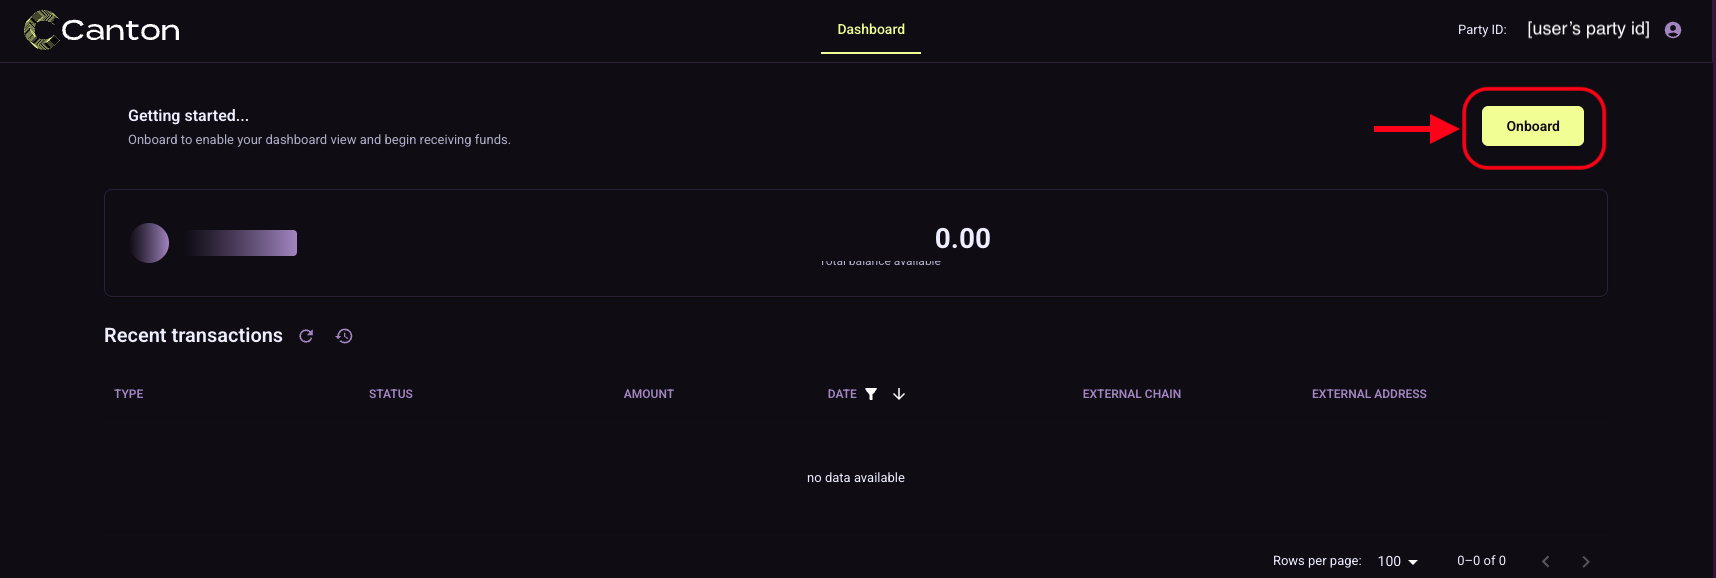
To proceed, the user should click on the yellow Onboard button.
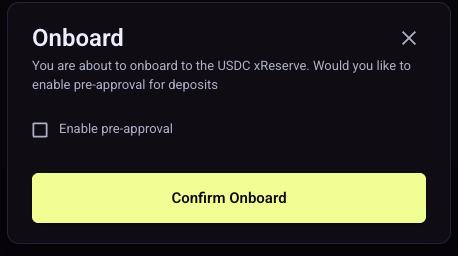
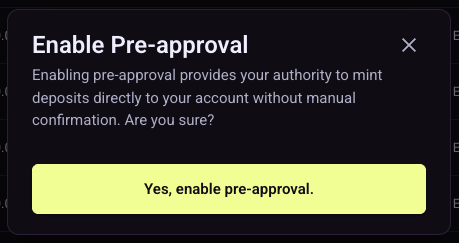
The user will see a popup to confirm the onboarding action, which includes a checkbox for the user to select if Pre-approval should be enabled for this Party Id. Pre-approval here refers to the user giving pre-approval authorization to the xReserve system (and delegating authority to it) to mint all incoming deposits for the user automatically. This choice can be changed in the future.
If Pre-approval is enabled, then all deposits for this Party Id will be automatically minted, based on the authority delegated by the user to the xReserve system**, without the need for the user to manually click the Mint button for each deposit attestation

If Pre-approval is not enabled, then the user will need to manually click the Mint button for new deposit attestation(s) in order for the USDC to be minted to their Party Id on Canton Network
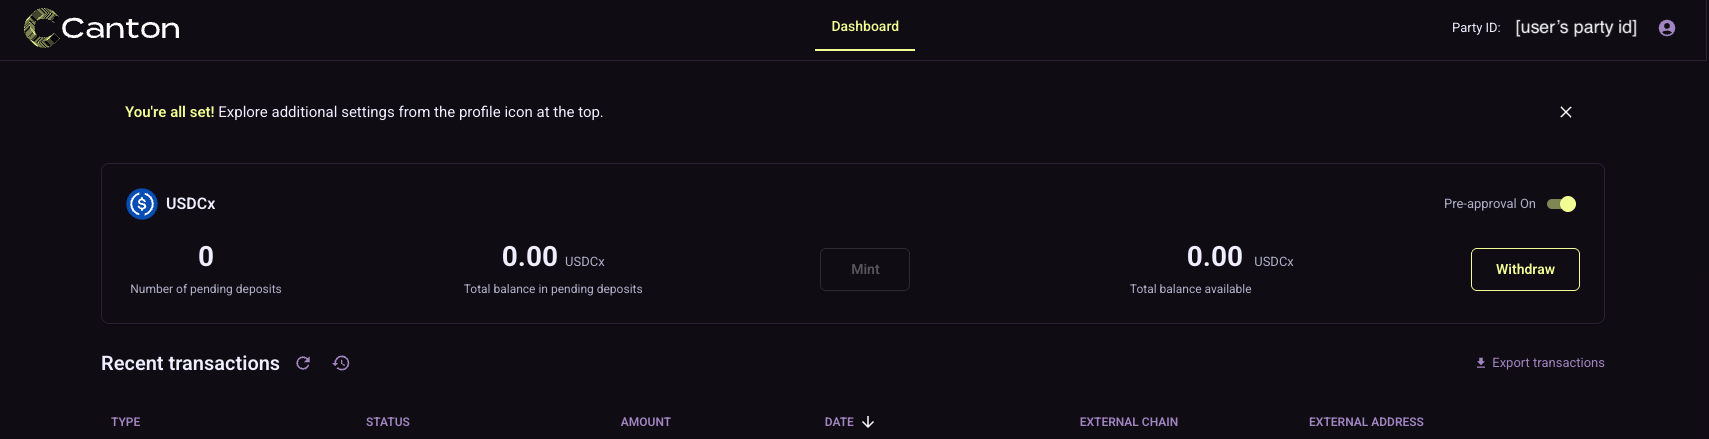
Once the user clicks the Confirm Onboard button on the popup they will see a Successfully requested onboarding popup on the bottom left of the screen.

Once submitted, the onboarding request is typically approved by the application operator within a short period of time (under 1 minute). Once done, the user now sees a message stating that they are all set on the main landing page. The landing page also displays their USDC balances and transactions. This concludes the onboarding process.
Offboarding Workflow
The user is able to reverse their onboarding and offboard their Party Id from being able to use the xReserve solution.
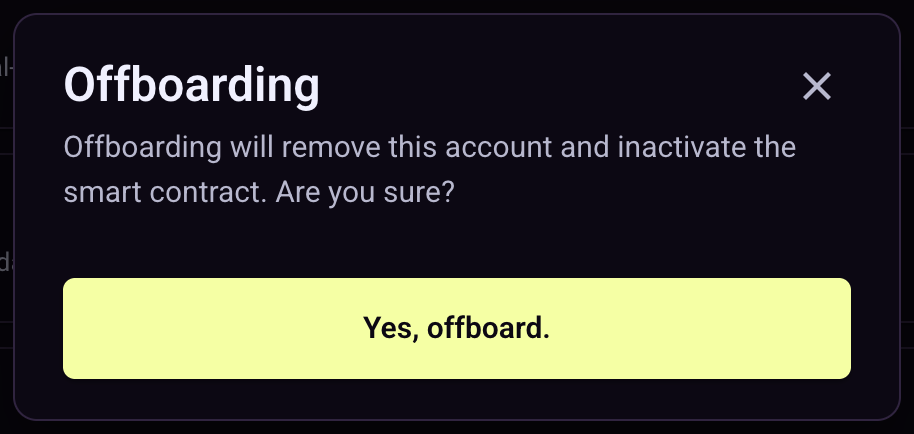
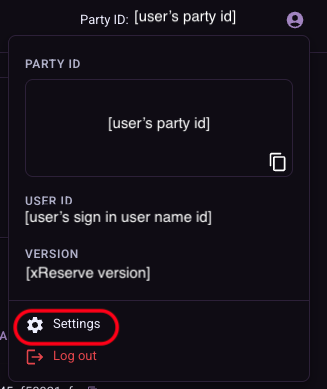
The user can do this from the Settings Page, which can be reached by clicking on the light purple person icon on the top right of the screen and then selecting on the Settings. The first option from the top will be Remove account (offboard).

Once the user clicks on the red Offboard button, they will see a popup to confirm the offboarding action. Once the user clicks Yes, offboard. on the popup, the offboarding process will complete and the user will no longer be able to use the xReserve solution with this Party Id.
The user could always choose to re-onboard again in the future if they wish to use the xReserve solution again by repeting the Onboarding steps outlined above.
Mint/Deposit Workflow
How to send funds on L1 chain (e.g. Ethereum)
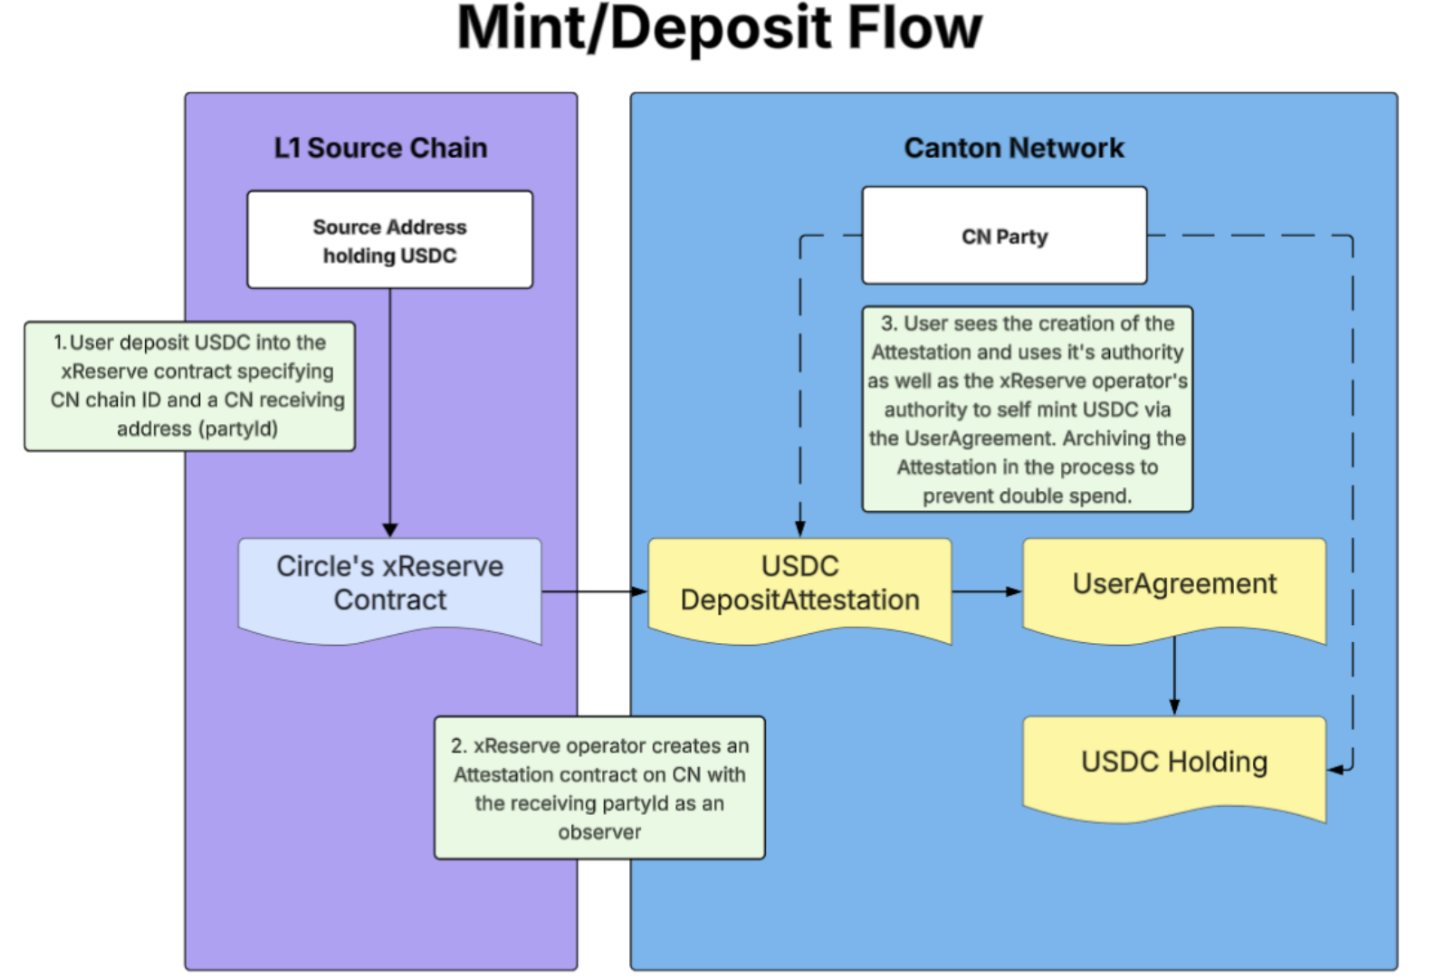
On an L1 chain such as Ethereum, USDC needs to be sent to the Circle’s xReserve contract, with additional meta data specifying that the funds should be created on Canton Network for a specific Party Id (analogous to a wallet address).
In order to send funds to Circle’s xReserve, the user has several options as outlined below.
Please note that fees may apply here depending on the L1 chain used, for example on Ethereum gas fees will apply.
Script
Open source script published by DA is available to be used by users here: https://github.com/digital-asset/xreserve-deposits.
Opensource UI
Digital Asset has created a lightweight UI that users can connect their wallets to (UI supports wallet connect) and can be used to send USDC from an L1 chain (e.g. Ethereum) and create USDC on Canton Network.
The UI supports sending USDC on both MainNet (e.g. Ethereum MainNet to Canton Network MainNet) and on TestNet (e.g. Ethereum Sepolia TestNet to Canton Network TestNet)
URL for UI: https://digital-asset.github.io/xreserve-deposits/.
Steps to use the UI:
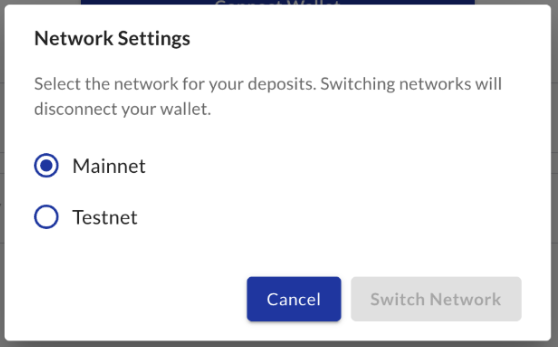
Select the environment - by default it is set to
MainNet.Users can switch to
TestNetand back by going to the Settings Gear icon on the top right.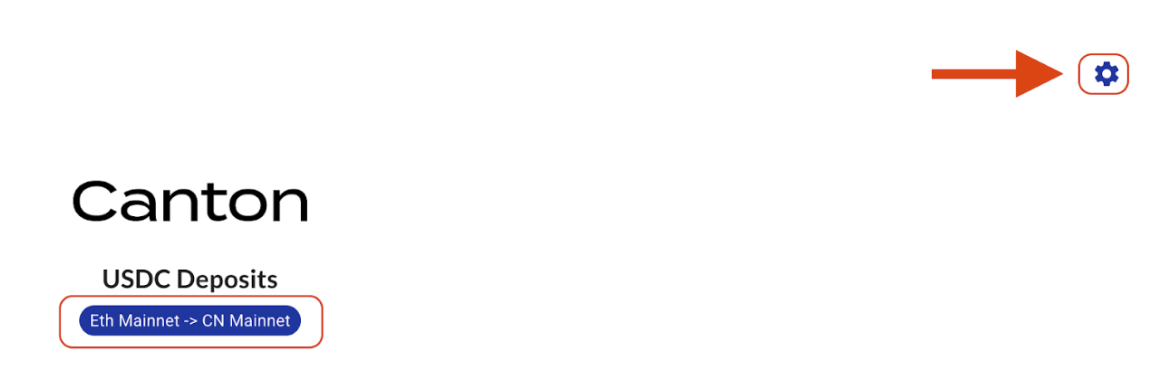
The environment can then be changed in the resulting popup.
Click on the Connect Wallet button to connect the UI with any wallet that supports
wallet connect(e.g. Meta Mask).Populate the information about how much USDC is to be sent for deposit (to be minted) on Canton Network and for which Party Id.
Amount (USDC) - the amount of USDC that will be sent to Circle’s xReserve contract and subsequently deposited (minted) on Canton Network.
Canton recipient party ID - the Party Id (equivalent to a wallet address) to which USDC on Canton Network will be deposited (minted). Importnatly this Party Id should be the same Party Id used in onboarding.
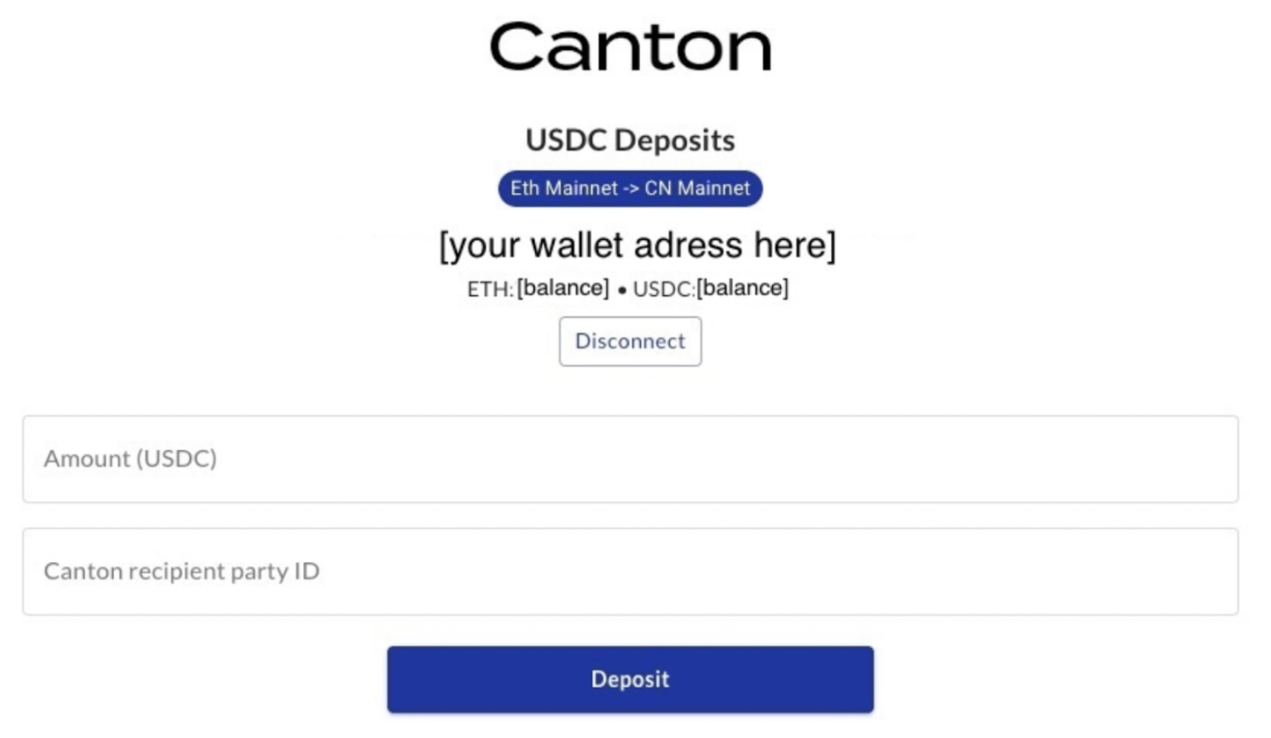
Once the correct amount and recipient are populated - click Deposit button.
The user will see a Confirm Deposit poupup reviewing the amount and outlining the action the user is taking and the next steps. Please make sure to read this thoroughly
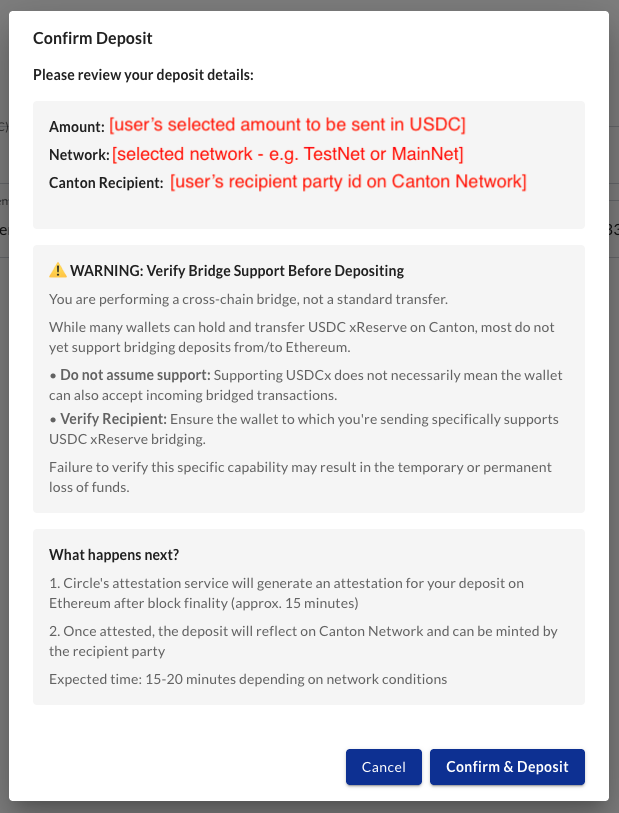
Once the user confirms the deposit popup, 2 transactions will be triggered that the user will need to approve via their wallet (which was connected in step 2).
Once completed, the user will need to wait for finality on the L1 chain - for example on Ethereum finality takes approximately 13 to 15 minutes (2 epochs).
Once finality for these transactions is achieved, Circle will confirm the deposit and create a deposit attestation which xReserve will create on the Canton Network as a contract for the user to action - see next section.
How to receive funds on Canton Network
Once the user has finished their onboarding process (as outlined above), they are able to mint USDC on Canton Network, as follows:
Once finality is reached on L1 chain, Circle will provide a deposit attestation which will then be written by the xReserve operator as a contract on the Canton Network.
Finality on Ethereum usually takes about 2 epochs, or 13 to 15 minutes.
The recipient user (whose Party Id was specified when sending USDC on the original chain) will be able to see and action the deposit attestation contract.
If the user has previously enabled Pre-approval for their Party Id, then the deposit attestation will be automatically actioned and the USDC will be automatically minted to their Party Id without the need for any manual user action.
If the user has not enabled Pre-approval for their Party Id, then the user will need to manually click the Mint button to mint all pending deposits as USDC onto the Canton Network.
User would see all pending deposits in the landing page of the xReserve UI, including the number of pending attestations and the total amount of USDC for all of these attestations.
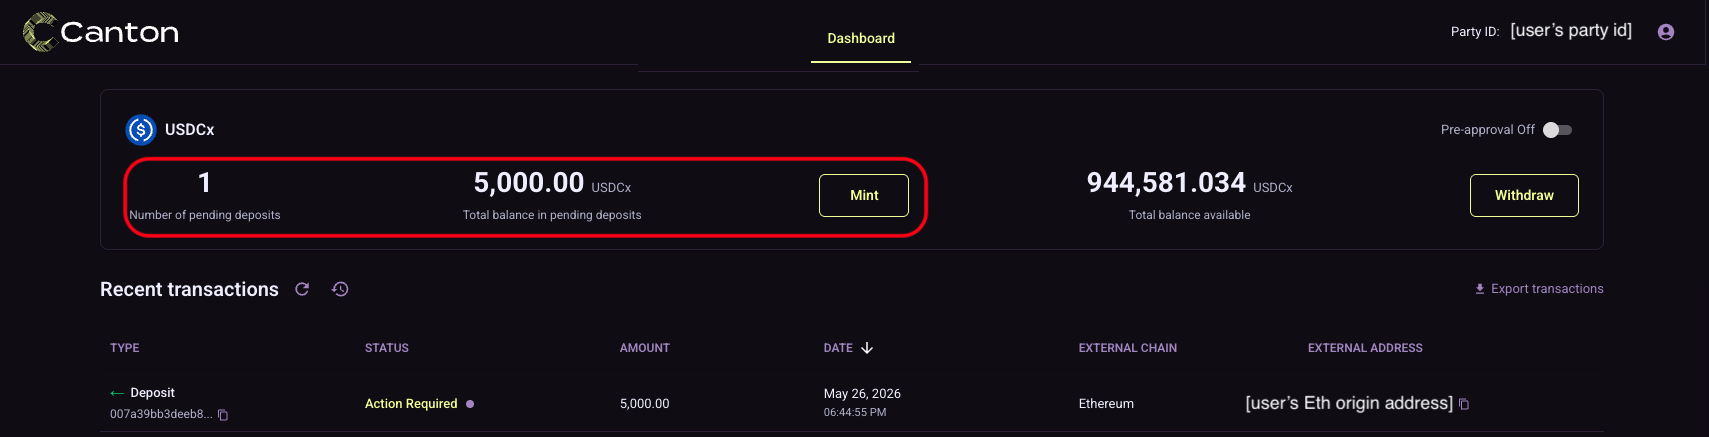
By clicking on the Mint button, the user can mint all of the pending deposits attestations at once.
After the system successfully processes the mints, the USDC holding for that same amount is minted to the user’s Party Id and a success banner is seen on the bottom left of the screen.

Once minted, the users holdings are updated and can be seen on the landing page of the xReserve UI.

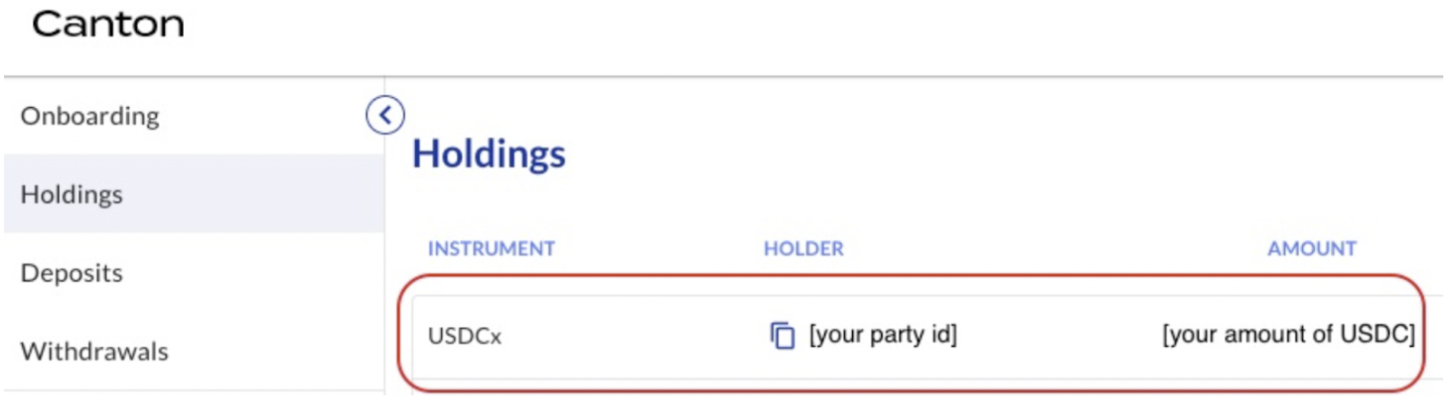
The new holding of USDC can also be seen in the DA Apps (Utilities) UI, in the Holdings section (2nd choice from the top on the left side navigation panel) of the Registry module. More details on this can be found in the DA Apps (Utilities) Registry Utility User Guide.
The user can now use the USDC holding by transferring it elsewhere or using it in other workflows.
USDC can be interacted with through a number of UIs that connect to the user’s Party Id (and the validator node on which that Party Id exists) - some common UIs can be the DA Apps (Utilities) UI or the user’s wallet UI.
Burn/Withdrawal Workflow
How to withdraw funds on Canton Network
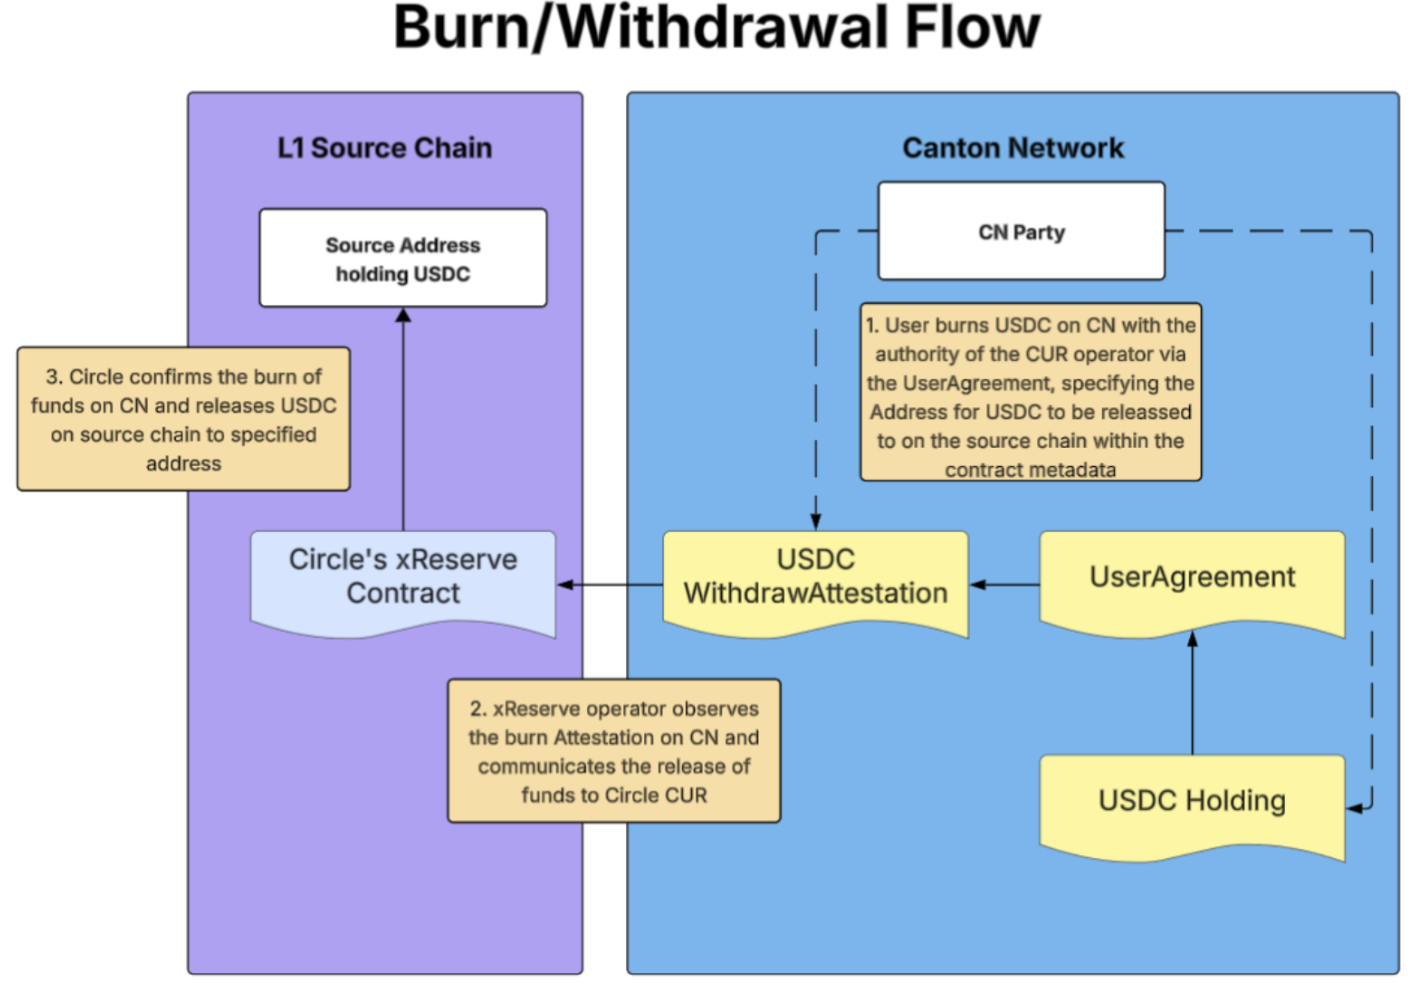
The user is able to withdraw (burn) USDC on Canton Network, which are held by their Party Id, as follows:
On the landing page of the xReserve UI, the user can see their USDC holdings and click on the Withdraw button to initiate a withdrawal (burn) request.

Once the user clicks the Withdraw button, a popup will appear asking the user to populate the below fields needed for USDC withdrawal:
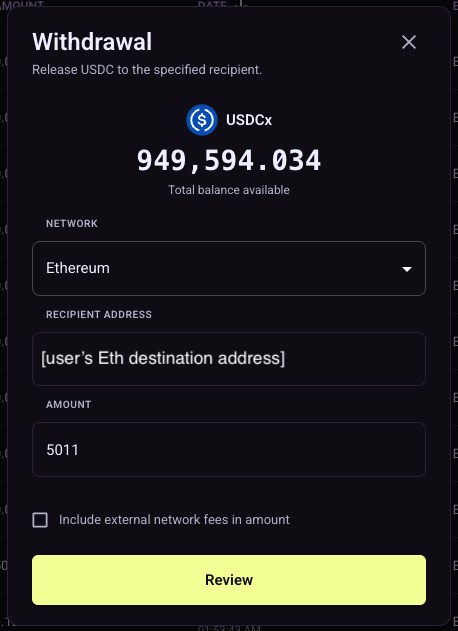
Network - select which destination L1 blockchain network to withdraw USDC to.
Recipient Recipient - specify the address on that L1 chain where the funds should be sent to.
E.g. address of the user’s wallet on Ethereum network.
Amount - amount of USDC to withdraw.
Up to 6 decimal points.
Cannot exceed amount of USDC held by the user.
Checkbox for Fees - a checkbox to specify if the witdrawal fee (flat fee charged by Circle for every withdrawal transaction) should be included in the previously specified amount or should be taken out on top of that amount.
Once the user clicks Review on the popup, another popup is presenteds to the user to review and confirm the withdrawal details.
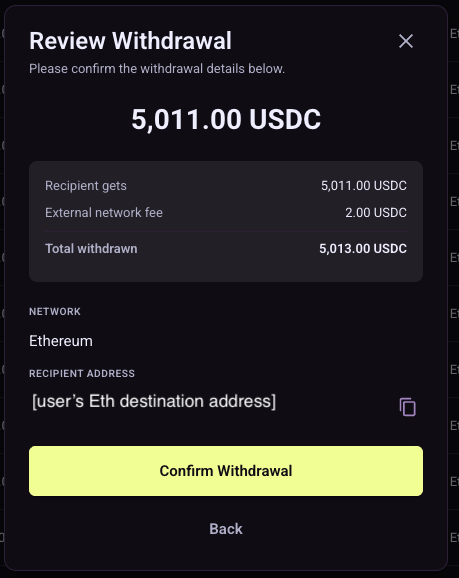
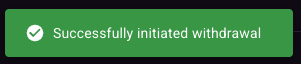
Once the user clicks to Confirm Withdraw on the popup, the amount of USDC specified by the user is burned on Canton Network and the user will receive that amount (less Circle’s withdrawal fee) on the destination chain. The user will also see a success banner on the bottom left of the screen confirming that the burn request was successful.
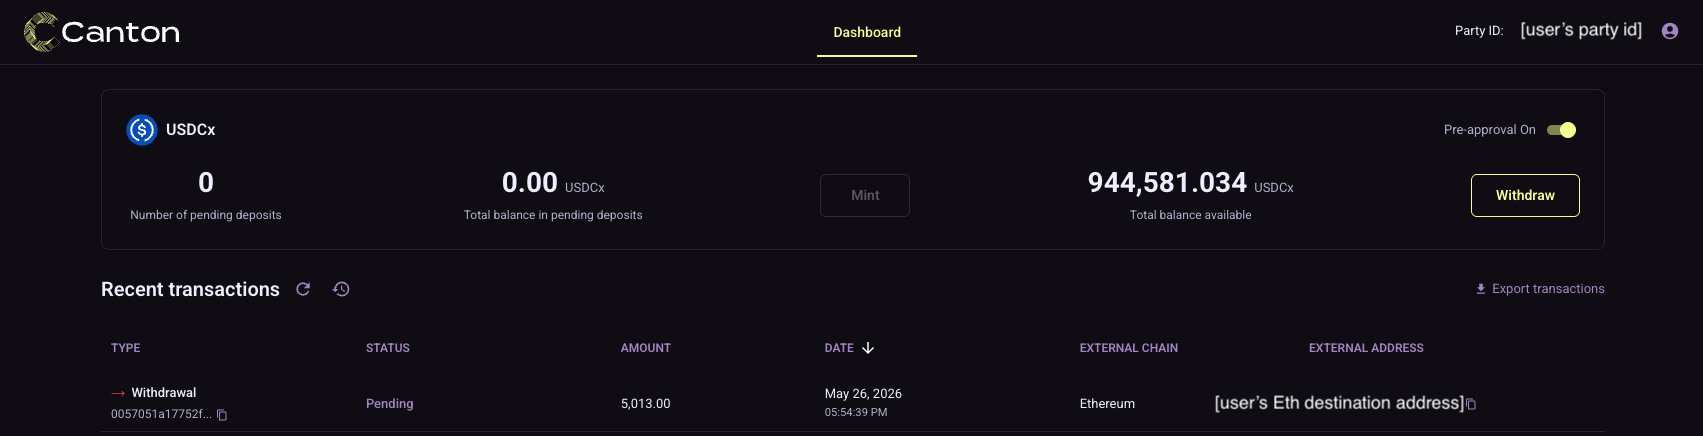
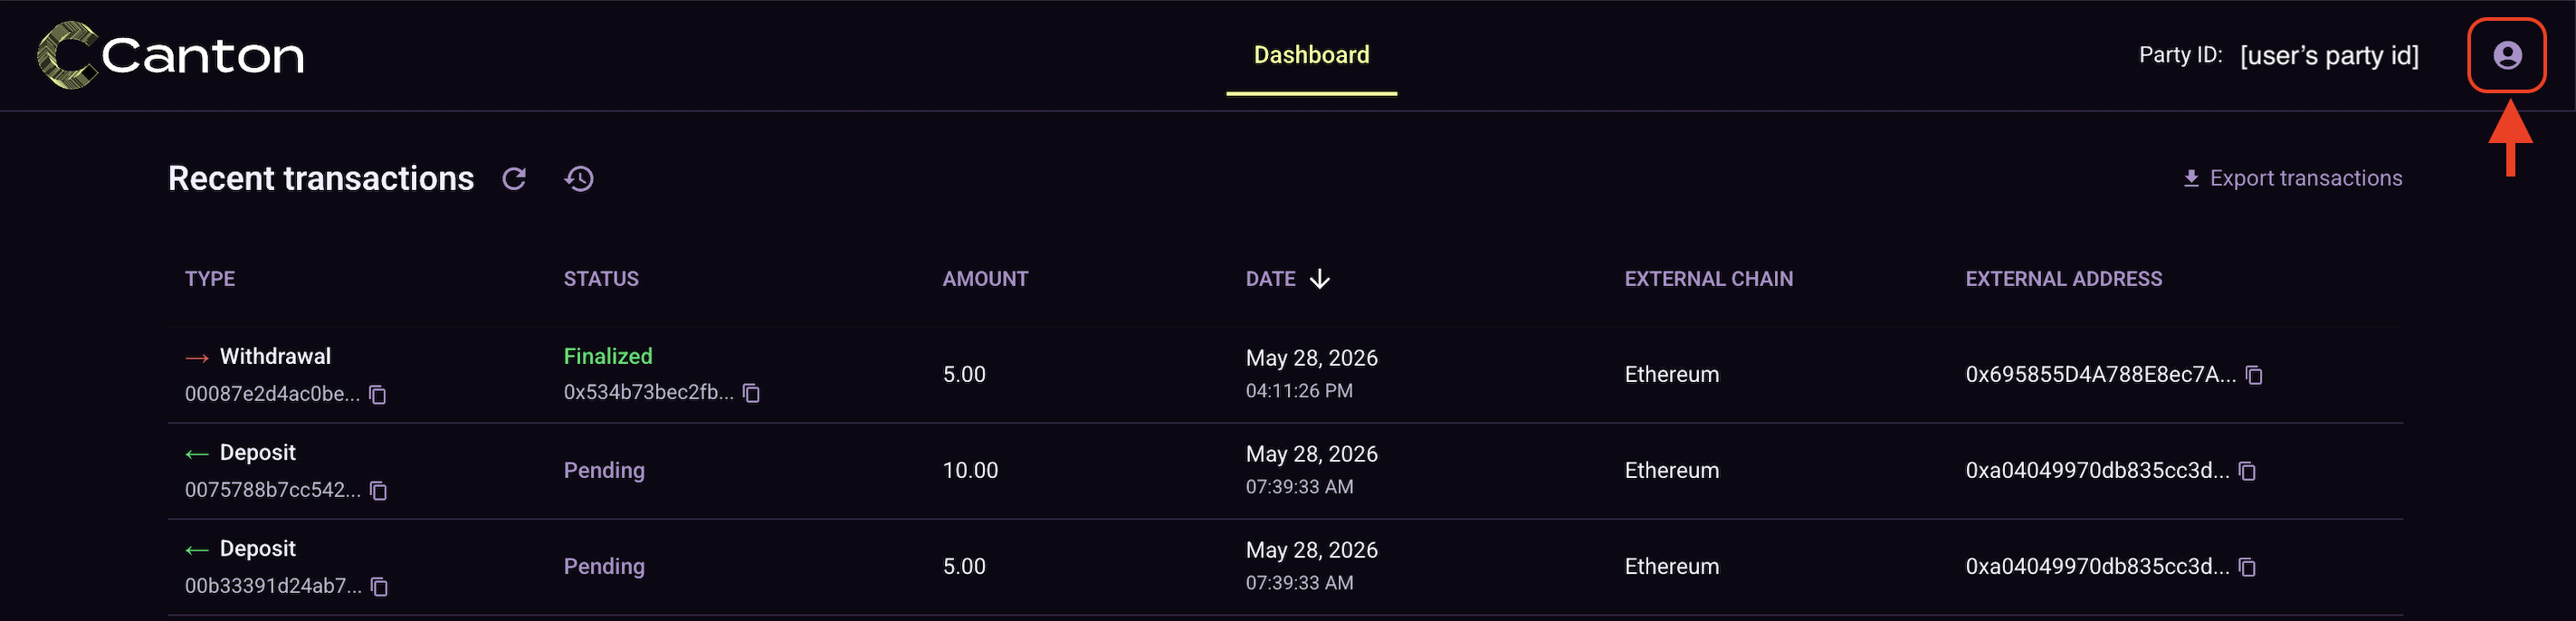
The user will be able to see the withdrawal transaction being processed in the transaction history on the landing page of the xReserve UI.
How to receive funds on destination L1chain (e.g. Ethereum)
Once the USDC holdings have been withdrawn (burned) by the user, the xReserve operator and Circle will both validate the withdrawal request. Once confirmed to be authentic, Circle will then release the equivalent amount of USDC minus the xReserve withdrawal fees on the specified destination chain and to the specified destination recipient address. The user can then verify that the funds have been released as expected.
The user will also be able to see this reflected in the transaction history on the landing page of the xReserve UI, where the transaction is updated with the Finalized status.
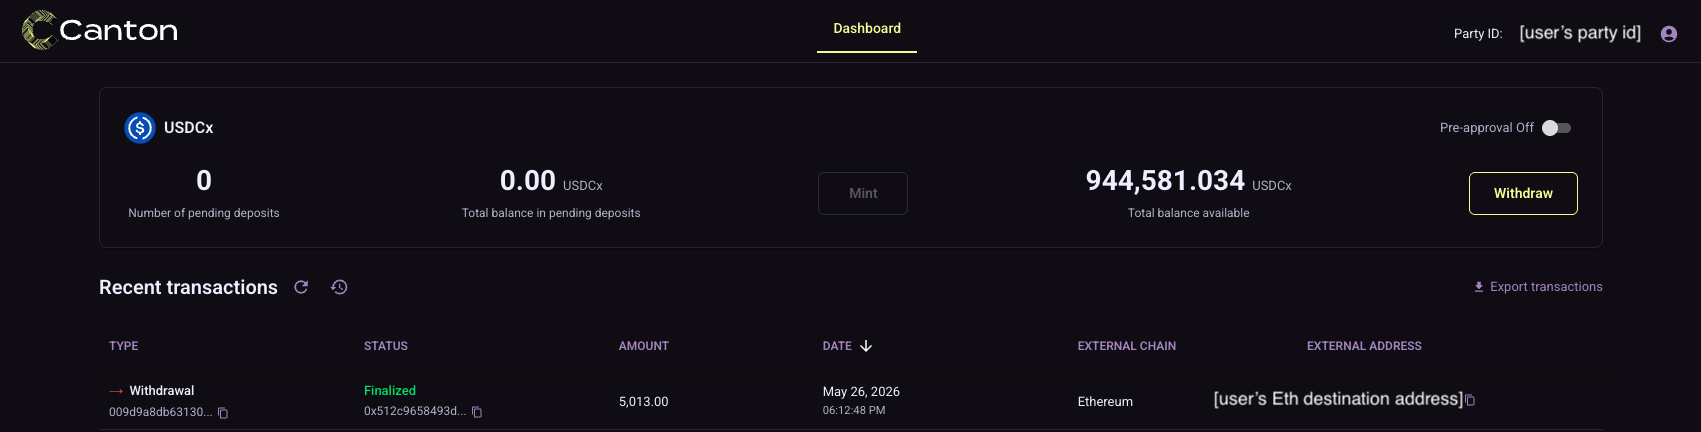
Pre-approval Setting
Pre-approval is a very important concept refers to the user giving pre-approval authorization to the xReserve system (and delegating authority to it) to mint all incoming deposits for the user automatically.
The user is able to change their Pre-approval setup any time on the landing page of the UI by doing the following:
User can use the Pre-approval toggle on the landing page to change setting

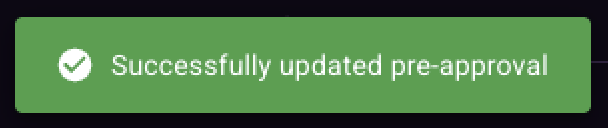
User will then see a popup to confirm the change in Pre-approval setting. Once the user confirms their choice they will see a success banner on the bottom left of the screen confirming that the Pre-approval setting has been updated.
User can then see the pre-approval setting change reflected on the landing page.

Please note that this option can also be changed from the Settings Page which is described in detail below.
All Settings
This section outlines all of the options in the Setting screen.
The user can access the settings page by clicking on the light purple person icon on the top right of the screen and then selecting on the Settings.
The Settings screen contains the following:
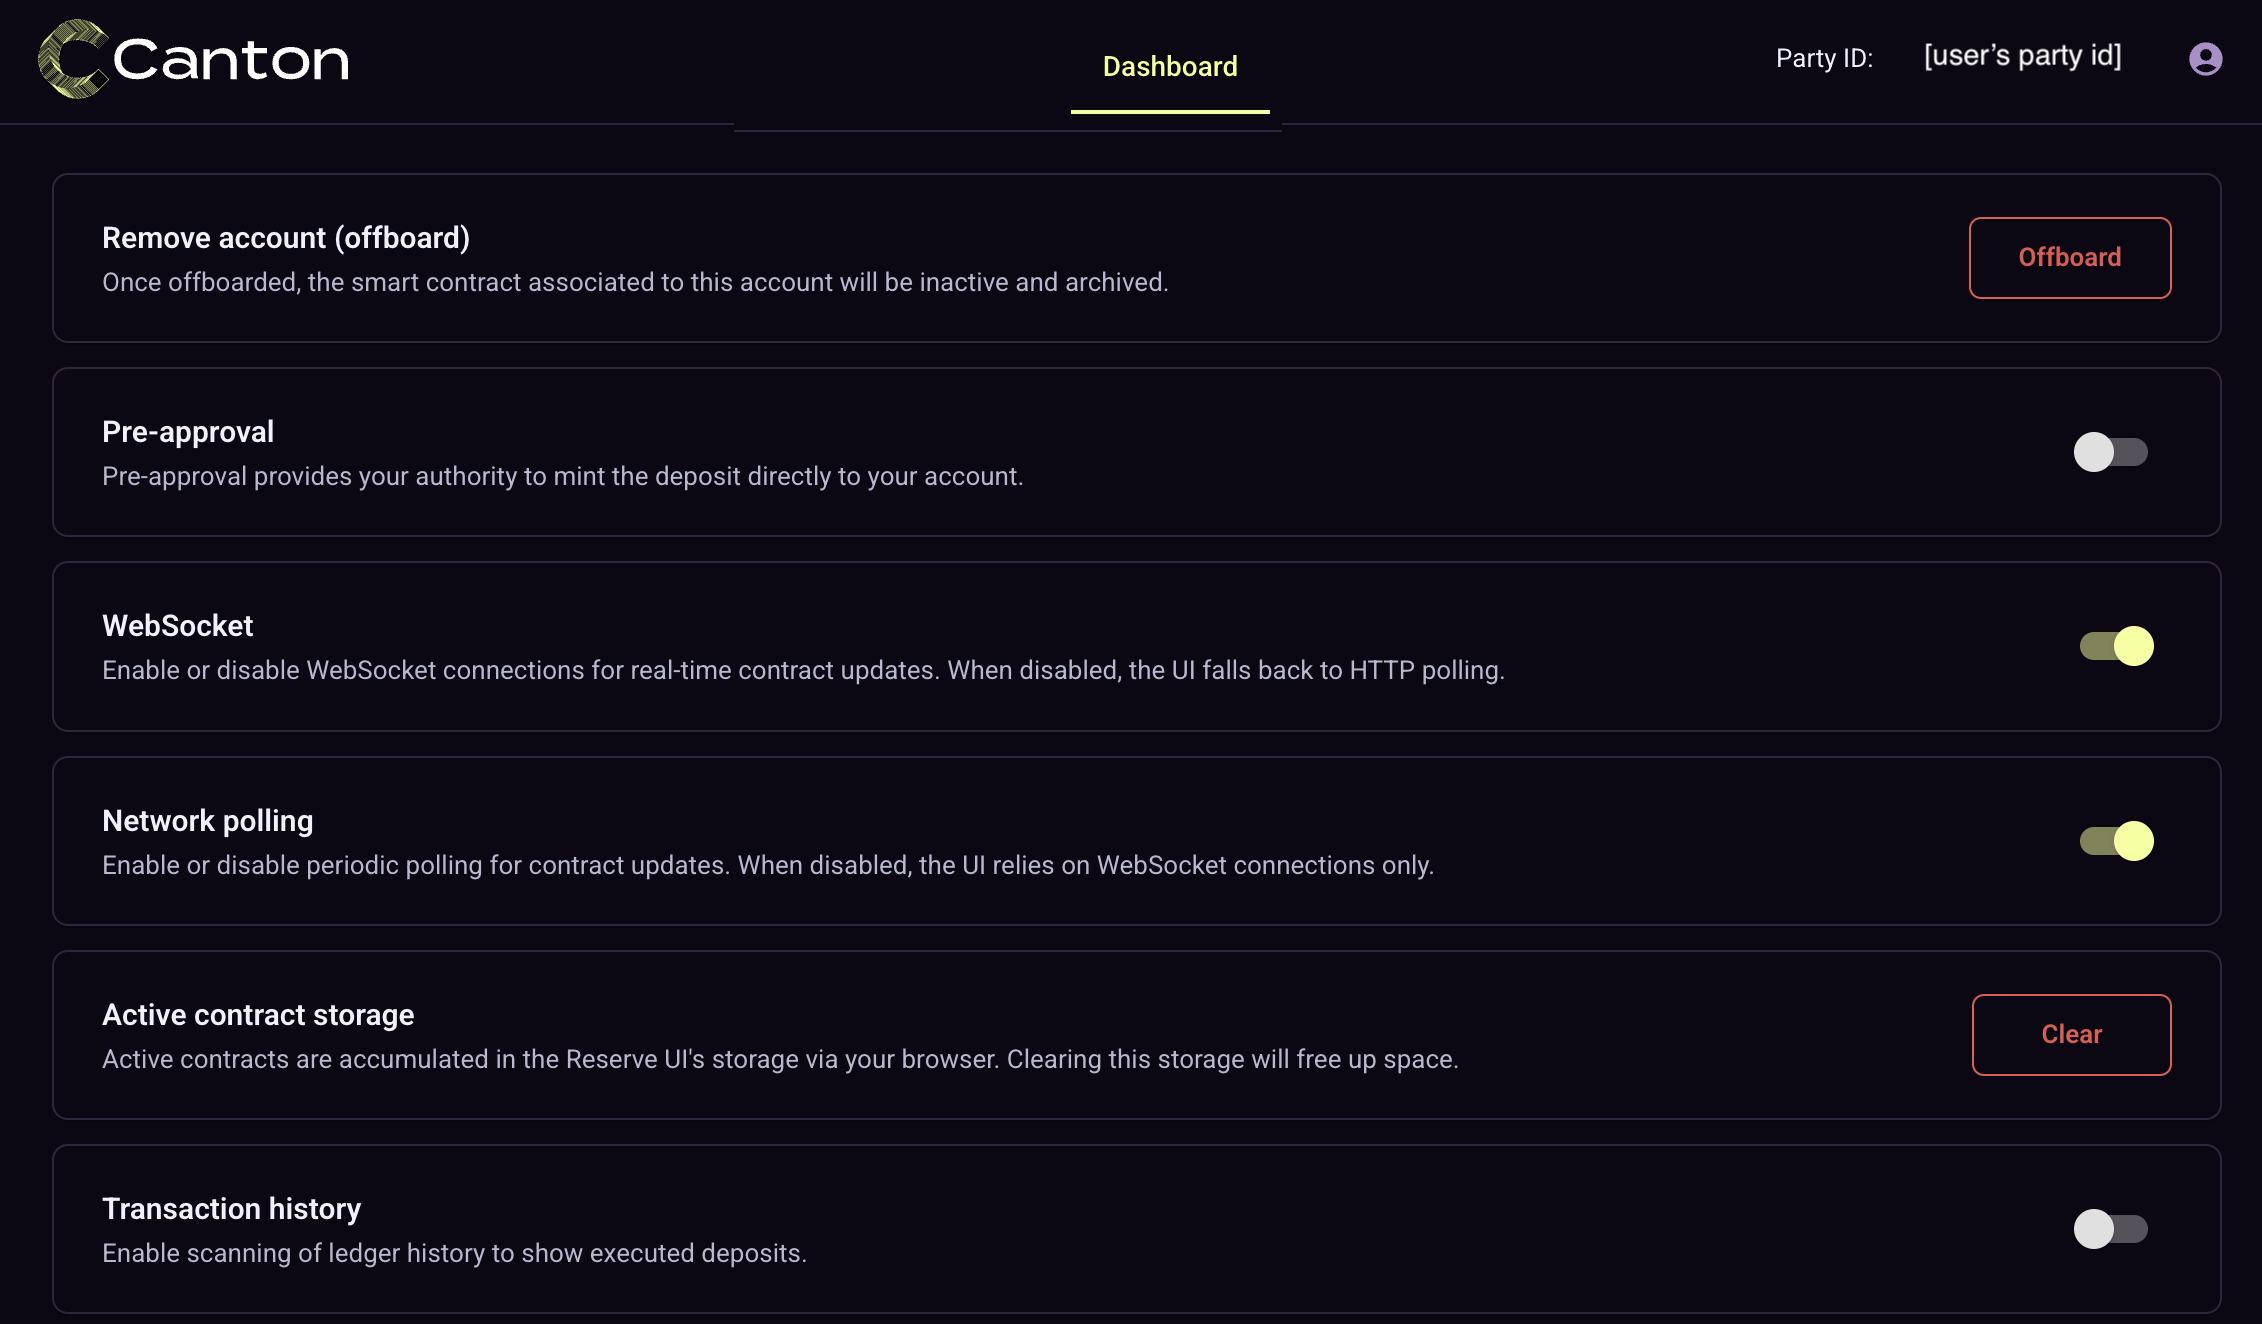
Remove account (offboard) - Once offboarded, the smart contract associated to this account will be inactive and archived. See the Offboarding section for further details.
Pre-approval - Pre-approval enables the user to provide their authority to mint the deposit directly to their account (aka Party Id). Settings allows yet another place where this can be managed. See the Pre-approval section for further details.
WebSocket - This setting allows user to enable or disable WebSocket connections for real-time contract updates. When disabled, the UI falls back to HTTP polling.
Network polling - This setting allows user to enable or disable periodic polling for contract updates. When disabled, the UI relies on WebSocket connections only.
Active contract storage - This setting allows the user to clear the existing active contracts which are accumulated in the Reserve UI.
Transaction history - This setting allows the user to enable or disable the display of executed deposits in the transaction history.